Contact: ganseymf@gmail.com
© Moray Firth Gansey Project June 2018
This project was part-


How to: Read a pattern chart
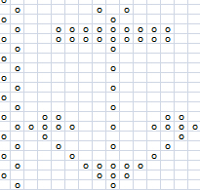
Gansey patterns are often presented as a chart. This gives the knitter a diagram of the surface pattern elements as seen when looking at the right side of the garment, e.g.:
In a published pattern written instructions will give the number of stitches, and the number of times the charted pattern is to be repeated in each round or row. Elements like welts and bands of plain knitting are not generally included in a chart. There may be several charts for the different pattern elements of one garment.
When working from a chart you generally start at the bottom right hand corner and work across the first row towards the left, e.g.:


If you are working in rounds, you will start each round at the right hand side, moving up to the next line at the start of each round.
If you are working back and forth on two needles your second (wrong side) row will start at the left hand edge of the chart. When you are knitting a wrong side row you need to read the symbol for purl stitches as knit and vice versa.
Notation
Stitches which appear as plain stitches on the right side of the garment are generally represented by blank boxes.
Purl stitches are shown by filled in boxes, often by: o, •, or x
Cables can be shown, as above, by a hooked line: or, perhaps more usually, like this:
In this example the cable is worked over two stitches; the first stitch is put to the back of the work, the second stitch knitted, then the first.

Start here


Work in the direction of the arrow


| Project outcomes |
| Contact us |
| The Moray Firth |
| Competition |
| Project outline |
| Exhibition gallery |
| Further Information |
| Gansey knitters gallery |
| Ganseys from other areas |
| Lewis |
| Pattern elements 1 |
| Pattern elements 2 |
| Pattern elements 3 |
| Small things to make |
| Beatrice Gansey |
| Read a chart |
| Chart a design |
| Portsoy 2012 |
| Wick Harbourfest 2012 |
| Ganseyfest 2011 |
| London Fashion Week |
| UK Knit Camp 2010 |
| Speyfest 2010 |
| Portsoy photos 2010 |
| Extravagansey photos 2010 |
| Nairn Museum |
| Gfest gallery |
| Gfest gallery 2 |